 ,
Sector
,
Sector  , Arc
, Arc  , and Spline
 tools from the toolbar.
To create a new shape, you can use the Line ,
Sector , Arc , and Spline
tools from the toolbar.
Choose a tool and use the mouse to draw a segment.
To add another segment to it, start drawing from one of the endpoints of the
existing one. This will lengthen the geometry.

If you start drawing a segment at any position with Ctrl (in Windows) or Cmd (in Mac OS) held down, this segment will be assigned to the currently selected shape, expanding it with a new geometry. So, the shape may consist of two (or more) separate geometries, but it's still one shape.
If you hold down the Shift key when drawing, the constrained drawing mode switches on. The way in which the constrained segments behave depends on the segment type.
Basic Segments
LineTo:
a line segment. It can be created with the Line tool. To
constrain a line to any 45-degree angle, hold down the Shift
key as you drag.
Note: To switch to the Line
tool, you can also select Line Segment from the Insert
menu, or press Ctrl+3.
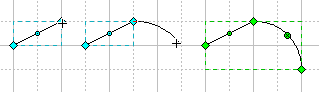
ArcTo: a sector
of a circle. It can be created with the Sector tool. The direction
in which you first drag the mouse determines which way the curve bows. The point
where you release the mouse button defines the other endpoint of the sector.
To change the direction in which the curve bows, hold down the Shift
key when you drag.
Note: To switch to the Sector
tool, you can also choose Sector Segment in the Insert
menu, or press Ctrl+4
EllipseTo:
an elliptical quarter segment. Use the Arc tool to create
it.
Note: To switch to the Arc
tool, you can also select Arc Segment from the Insert
menu, or press Ctrl+5.
Spline
To: a smooth curve (also called spline). It can be created with
the Spline tool. This tool works like a pencil on paper, the
only difference is that the curve results smooth rather than jagged. Once drawn, the spline is
easy to modify by adjusting its vertices and adjustment handles.
Note: To switch to the Spline
tool, you can also check Spline Segment in the Insert
menu, or press Ctrl+6.
Note: You can control the smoothness of the spline.
This can be done with the Spline Smooth control in the Geometry
floating dialog. Spline smoothness may range from 0 to 100. When it equals 0,
the spline is not smoothened at all and exactly follows the movements of the
mouse. 100 provides maximal smoothness. For details see Dialogs - Floating
Dialogs - Geometry.
Elementary Shapes
Besides single segments, you can also draw some widely-used shapes: rectangle, ellipse, "Text" shape. Use the corresponding toolbar buttons for each of them.
 Rectangle:
creates a filled rectangle. Drag the mouse to determine its size. By holding
down the Shift key as you draw, you constrain the rectangle
to a square.
Rectangle:
creates a filled rectangle. Drag the mouse to determine its size. By holding
down the Shift key as you draw, you constrain the rectangle
to a square.
Note: To switch to the Rectangle tool, you can
also select Rectangle from the Insert menu,
or press Ctrl+7.
 Ellipse:
draws a filled ellipse. Drag the mouse to determine its size. By holding down
the Shift key as you drag, you constrain the ellipse to a circle.
Ellipse:
draws a filled ellipse. Drag the mouse to determine its size. By holding down
the Shift key as you drag, you constrain the ellipse to a circle.
Note: To switch to the Ellipse tool, you can
also select Ellipse from the Insert menu,
or press Ctrl+8.
 Edit Text: creates a "Text" shape. Drag
the mouse to determine the size of the box. If you hold down the Shift
key as you drag, you will get a square box. After you release the mouse button,
the Edit Text mode switches on, and you can type the text in
the box.
Edit Text: creates a "Text" shape. Drag
the mouse to determine the size of the box. If you hold down the Shift
key as you drag, you will get a square box. After you release the mouse button,
the Edit Text mode switches on, and you can type the text in
the box.
Note: To switch to the Edit Text
mode, you can also select Text from the Insert
menu.
In any other tool mode, you can activate the text editing mode for a while: just select the needed shape and press F2. And when you finish editing text, press F2 or Esc.